Introduction:
Before getting onto how Behat functions, let's get into knowing What is Behat? Behat is a PHP-based framework for Behavioural Driven Development or BDD. Automated Testing With Behat: BDD the simplicity of Behat lies in the fact that it can define all possible scenarios and behaviors in simple English steps of when and then. This is also known as the Gherkin format.

Prerequisites and Installation for Automated Testing With Behat: BDD:
Prerequisite
Now, let us start with setting up Behat into our machine. To set up Behat on your machine we would need to have the prerequisites.
- PHP installed on your machine. If you are using Behat version 3.0, then it is preferable if we use PHP version 7.0. I have been using Ubuntu 16.04 LTS version. For Ubuntu 16.04 it comes pre-installed within the system.
- Composer installed on your machine. A composer is a PHP dependency management tool that helps in managing the required libraries for PHP related to a project. The dependencies are installed within a directory named Vendor.
Installation
To install the composer follow the below-mentioned steps.
a) First, update the package manager cache by running.
$ sudo apt-get update
b) Secondly, install the dependencies for installing the composer. We will be needing curl in order to download composer and php-cli for installing and running it. The php-mbstring package is necessary to provide functions for a library we will be using. git is used by a composer for downloading project dependencies and unzip for extracting zipped packages. Everything can be installed using the following command.
$ sudo apt-get install curl php-cli php-mbstring git unzip
c) Composer provides an installer, written in PHP. Make sure, you are in the home directory and retrieve the installer using curl.
$ cd ~
$ curl -sS https://getcomposer.org/installer -o composer-setup.php
d) To install composer globally use the following
$ sudo php composer-setup.php --install-dir=/usr/local/bin --filename=composer
This will install and download composer as a system-wide command named composer, under /usr/local/bin.
e) To test your installation run
$ composer
What is Composer? How do you install it?
In order to use Composer in your project, you will be needing composer.json file. The composer.json file basically tells the Composer which dependency it basically needs to download for your project and which versions of each package are allowed to be installed. This is extremely important to keep your project consistent and avoid installing unstable versions that could potentially cause backward compatibility issues.
You don’t need to create this file manually – it’s easy to run into syntax errors when you do so. Composer auto-generates the composer.json file when you add a dependency to your project using the required command. Additional dependencies can also be added in the same way, without the need to manually edit this file.
The process of using Composer to install a package as the dependency in a project usually involves the following steps:
- Identify what kind of library the application needs.
- Research a suitable open-source library on packagist.org, the official package repository for Composer.
- Choose the package you want to depend on.
- Run composer requires to include the dependency in the composer.json file and install the package.
Now let us start with adding the dependency for Behat in the composer.json file . Here are the following dependencies that are required for installing Behat onto the system.
{
 "require": {
 "behat/behat": "~3.0",
 "behat/mink": "~1.5.0",
 "behat/mink-extension": "v2.0.1",
 "drupal/drupal-extension": "~3.0",
 "behat/mink-selenium2-driver": "v1.1.1",
 "behat/mink-goutte-driver": "~1.0",
 "phpunit/phpunit": "~3.7.37",
 "behat/mink-browserkit-driver": "*"
 },
"config": {
 "bin-dir": "bin/"
 }
 }
Now Behat is installed in the bin directory. Next, you have to execute the command
$ bin/behat --init
The init command initializes the current working directory with the ‘features’directory. Feature directory consists of the feature files. These feature files contain the pre-defined Gherkin steps to replicate user behaviors or carry out acceptance tests.
Once the basic set up is done the folder structure looks something like this.
Now if we check the ‘bootstrap’ directory inside ‘Features’ directory, we have the ‘Feature_Context.php’. This file plays a crucial role in the processing of the Behat steps. The Feature_Context file consists of the FeatureContext class.
Context Class:
The Context class is a simple POPO (Plain Old PHP Object) used by Behat to represent testing part of your features suite. If *.feature files are all about describing how your application behaves, then the context class is all about how to test your application, and that it actually behaves as expected.
Prerequisites for Context Class:
In order to be used by Behat, your context class should follow simple rules:
- Context class should implement Behat\Behat\Context\ContextInterface or extend base class Behat\Behat\Context\BehatContext.
- Context class should be called FeatureContext.It’s a simple convention inside the
Behat infrastructure.Context class should be findable and loadable by Behat.
That means you should somehow tell Behat about your class file. - Put your class file inside the features/bootstrap/directory.
All *.php files in this directory are autoloaded by Behat before any feature is run
Contexts Lifetime:
Your context class is initialized before each scenario runs, and every scenario has its very own context instance. This means 2 things:
- Every scenario is isolated from each other scenario’s context. You can do almost anything inside your scenario context instance without the fear of affecting other scenarios – every scenario gets its own context instance.
- Every step in a single scenario is executed inside a common context instance. This means you can set private instance variables inside your @Givensteps and you’ll be able to read their new values inside your @When and @Thensteps.
By default, Behat provides a set of Step definitions which you can see by just typing in the following command in the console
$ bin/behat -dl
This will enlist all the default step definitions available with Behat.
Setting up the Configuration for Automated Testing With Behat: BDD:
Lets talk about how to set the configuration of your entire test suit in Behat. For that, we have a file named ‘behat.yml’
All configuration happens inside a single configuration file in the YAML format. Behat tries to load behat.yml or config/behat.yml by default, or you can tell Behat where your config file is with the --config option
$ behat --config behat.yml
Few of the important features of the Behat configuration file that should be kept in mind
All configuration parameters in that file are defined under a profile name root (default: for example). A profile is just a custom name you can use to quickly switch testing configuration by using the --profile option when executing your feature suite.
The default profile always defaults. All other profiles inherit parameters from the default profile. If you only need one profile, define all of your parameters under the default: root:
The context in the Behat configuration file:
Sometimes you may want to use a different default context class or provide useful parameters for the context constructor from your behat.yml. Use the context block to set these options:
# behat.yml
default:
    context:
        class: Your\Custom\Context
        parameters:
            base_url: "http://test.mink.loc"
Profiles:
Profiles help you define different configurations for running your feature suite. Let’s say we need 2 different configurations that share common options, but use different formats. Our behat.yml might look like this:
staging:
  extensions:
    Behat\MinkExtension:
      base_url: ""
 production:
  extensions:
    Behat\MinkExtension:
      base_url: ""
For example in the above snippet for the behat.yml I have mentioned in two profiles staging and production. The profile for staging defines the tests to be run on the staging URL whereas the profile for production runs the requires tests in the production URL. To run the tests on the specific profile we can use the following command.
$ bin/behat --profile staging
Extensions:
The extensions block allows you to activate extensions for your suite or for a specific profile of the suite:
extensions:
  Behat\MinkExtension:
    goutte:
      guzzle_parameters:
        verify: false
        curl.options:
          CURLOPT_SSL_VERIFYPEER: false
          CURLOPT_CERTINFO: false
          CURLOPT_TIMEOUT: 120
          ssl.certificate_authority: false
    base_url:""
Writing Behat Scenarios using Gherkin format:
Gherkin is a line-oriented language that uses indentation to define the structure. Line endings terminate statements (called steps) and either spaces or tabs may be used for indentation. (We suggest you use spaces for portability.) Finally, most lines in Gherkin start with a special keyword:
Feature: Test the required xyz feature
Scenario: Some determinable business situation
     Given some precondition
     And some other precondition
     When some action by the actor
     And some other action
     And yet another action
     Then some testable outcome is achieved
     And something else we can check happens too
Scenario: A different situation
  ...
The parser divides the input into features, scenarios, and steps. Let’s walk through the above example:
Feature: Test the requires xyz feature starts the feature and gives it a title.
Scenario: Some determinable business situation starts the scenario.
The next few lines after Scenario are the scenario steps,
each of which is matched to a regular expression defined elsewhere.
Scenario: A different situation starts the next scenario, and so on.
When you’re executing the feature, the trailing portion of each step (after keywords like Given, And, When, etc) is matched to a regular expression, which executes a PHP callback function.
Features:
Every *.feature file conventionally consists of a single feature. A feature usually contains a list of scenarios. You can write whatever you want up to the first scenario, which starts with Scenario: (or localized equivalent) on a new line. You can use tags to group features and scenarios together, independent of your file and directory structure.
Every scenario consists of a list of steps, which must start with one of the keywords Given, When, Then, But or And (or localized one). Behat treats them all the same. Here is an example
Feature: Validate the feature of contact us page
@blackbox @1
 Scenario: Check all the texts of the contact us page
     Given I am at ""
     And I should see text matching ""
    And I should see text matching ""
Tags:
Tags are a great way to organize your features and scenarios. Consider the above example: In the above example if you check I have used two scenarios @blackbox@1. The tag @blackbox signifies that any Scenario with this tag will be executed on goutte driver, a headless driver which is used to execute the desired tests. Using the tag @1 helps me in telling Behat which specific scenario I need to execute from a feature file.
A Scenario or Feature can have as many tags as you like, just separate them with spaces. To understand tags from the system’s point of view, are basically metadata that helps Behat in identifying separate executions. It also reduces excess effort when it comes to executing identical scenarios for the developer.
Steps:
Features consist of steps, also known as ‘Givens’, ‘Whens’ and ‘Thens’.
Behat doesn’t technically distinguish between these three kind of steps. These words have been carefully selected for their purpose in order to make the steps user readable and identically distinguishable.
Givens:
The purpose of Given steps is to put the system in a known state before the user (or external system). Avoid talking about user interaction in givens. Givens are your preconditions. For example
Given I am at "/wordpress/home"
Whens:
The purpose of When steps is to describe the key action the user performs or defining the state transitions. For example
When I fill "username" with ""
When I fill "password" with ""
Thens:
The purpose of Then steps is to observe outcomes. The observations should be related to the business value/benefit in your feature description. The observations should inspect the output of the system. For example
Then the url should match "/wordpress/home/business"
And, But:
And or But steps can be used to allow your Scenario to be read more fluently. For example
And I should see text matching ""
And I should see text matching ""
Executing Behat Test Scenarios or Feature files:
Here are some specific ways by which you can execute Behat test scenarios
1. Execute the entire Behat test suite
$ bin/behat features/
2. Execute entire test scenarios for a specific feature file
$ bin/behat features/file1.feature
3. Execute scenarios specific to an entire test suite
$ bin/behat features/ --tags smoke
4. Execute scenarios specific to a feature file
$ bin/behat features/file1.feature --tags smoke
5. Execute test scenarios specific to a profile
$ bin/behat features/ --profile staging
Where, staging is the profile name defined in the behat.yml configuration file.
Drivers available to execute Behat tests:
- Selenium WebDriver
- Goutte Driver
- PhantomJS + Selenium
Note: To run your tests headless on phantomjs you have to start the phantomjs-selenium server at port 8643. To start your phantom webdriver on port 8643 use this following command
phantomjs --webdriver=8643
Phantomjs and Goutte are used to run all the scenarios headless i.e you have to rely on your CLI to view the output.
Generating reports in Automated Testing With Behat: BDD:
Well, this part has been pretty rough when dealing with Behat version 3.0. The pretty html formatter has been deprecated in this version of Behat. But there is a very good plugin for generating HTML reports in Behat known by the name behat-html-formatter. The configuration is pretty easy. All you need is to include the dependency in your composer.json file. Once that is done make configurational changes for the Behat-html-formatter plugin in the configuration file of Behat which is behat.yml. All you need to include is
formatters:
  pretty: true
  html:
    output_path: %paths.base%/build/html
and
extensions:
  emuse\BehatHTMLFormatter\BehatHTMLFormatterExtension:
     name: html
     renderer: Twig,Behat2
     file_name: Report
     print_args: true
     print_outp: true
     loop_break: true
Here are few of the screenshots of steps required to start with using Behat
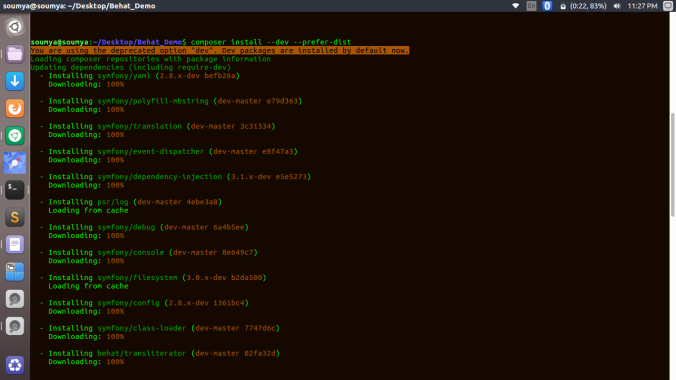
Installing dependencies using Composer:
Initialising the feature folder within the directory:
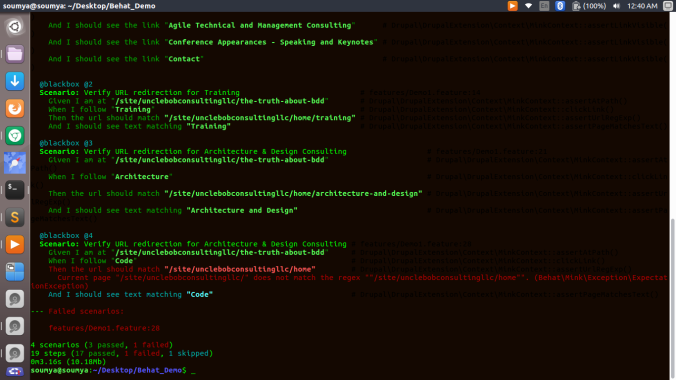
Execution of Behat test scenarios:
Generating Test Reports for Behat:
To know more and explore more on Behat you can check on my Github link
This is all for today. Keep patience until my next blog !! Keep Learning and Keep Exploring ?